
Pytest测试框架
Pytest是Python一款三方测试框架,用于编写和运行单元测试、集成测试和功能测试
主要特点:
- 简单易用:Pytest测试框架的API简单易用,可以快速编写测试用例。
- 灵活多样:Pytest测试框架支持多种测试方式,包括函数式测试、类式测试、参数化测试、fixture测试等。
- 插件机制:Pytest测试框架支持插件机制,可以通过插件扩展测试框架的功能。
- 断言机制:Pytest测试框架支持多种断言方式,包括assert语句、assert关键字、assert表达式等。
- 报告机制:Pytest测试框架支持生成多种测试报告,包括控制台报告、HTML报告、JUnit报告等
安装
1 | pip install pytest |
编写及运行测试用例
!!! 测试执行直接执行pytest就可以自动查询test开头的测试脚本,创建测试用例需符合框架标准
- 新建一个test_开头(必须)的.py文件,如
test_user_login.py - 编写一个Test开头(必须)的类,做为测试类
- 在类中编写一个test_开头(必须)的方法,作为用例
- 新建test开头的测试脚本,如test_calc.py,编写测试函数 或 测试类
1 | def test_add(): # 测试函数需以test_开头 |
- 运行测试用例 一
1 | pytest test_calc.py |
- 运行测试用例 二
1 | if __name__ == '__main__': |
测试准备及清理 - 夹具
Pytest中可以使用不同范围的setup/teardown方法进行测试准备及清理
1 | def setup_module(): |
参数化(数据驱动)
Pytest中可以@pytest.mark.paramitrize()装饰器给测试用例附带参数
1 | # 参数变量名,数据列表 |
支持多个参数变量,也支持为每个数据添加自定义说明(id)
1 | data = [(1,2,3), (0,0,0), (-1,2,1)] |
跳过及期望失败
Pytest中可以@pytest.mark.skip()或@pytest.mark.skipif()装饰器来跳过或根据条件跳过用例
- 无条件跳过
1 |
|
- 根据条件跳过
1 | from platform import platform |
- 也可以使用
@pytest.mark.xfail()来期望用例失败
1 |
|
Pytest测试框架的命令行参数
1 | # 用例挑选相关命令行参数 |
Pytest内置makers标记
在命令行使用pytest –markers可以查看所有可使用(包含用户已注册)标记。
@pytest.mark.filterwarnings(warning):过滤指定警告
1 |
|
@pytest.mark.skip(reason=None):无条件跳过用例
1 |
|
@pytest.mark.skipif(condition, …, *, reason=…):根据条件跳过用例
1 |
|
@pytest.mark.xfail(condition, …, *, reason=…, run=True, raises=None, strict=xfail_strict):根据条件期望用例失败
1 |
|
@pytest.mark.parametrize(argnames, argvalues):参数化数据驱动 - 跳转
@pytest.mark.usefixtures(fixturename1, fixturename2, …):标记引用(依赖)某些Fixture函数
1 |
|
也可以自定义markers
Pytest测试框架的配置项
pytest.ini文件[pytest]中常用配置项如下
| 配置项 | 说明 |
|---|---|
| addopts | 默认额外的参数; |
| cache_dir | 缓存目录,用于缓存上次执行失败的用例; |
| markers | 注册的自定义标记及说明; |
| norecursedirs | 不遍历的目录; |
| testpaths | 测试目录; |
| python_files | 测试脚本匹配规则,默认test_开头的py文件视为用例,如果有的测试脚本不是以test_开头,可以配置为pythonfiles = *; |
| python_class | 测试类匹配规则,默认Test开头的类视为测试类; |
| python_functions | 测试函数及测试方法匹配规则,默认test_开头的函数及方法视为测试用例; |
| console_output_style | 命令行输出样式,支持classic、progress、counts三种样式; |
| filterwarnings | 过滤的警告; |
| xfail_strict | 启用时,标记为xfail的用例通过时状态为Fail,否则为XPassed。 |
日志相关配置
| 配置项 | 说明 |
|---|---|
| log_print | 用例失败时是否显示相关日志; |
| log_cli | 配置为ture时开启命令行日志; |
| log_file | 配置日志文件路径,每次覆盖,不支持追加模式;v |
| log_cli_level/log_file_level | 配置输出到命令行及文件的日志等级; |
| log_cli_format/log_file_format | 配置输出到命令行及文件的日志格式; |
| log_cli_date_format/log_file_date_format | 配置日志的日期格式。 |
pytest常用断言
assert ‘a’ not in ‘abc’
- 等于:==
- 不等于:!=
- 大于:>
- 小于:<
- 属于:in
- 不属于:not in
- 大于等于:>=
- 小于等于:<=
- 是:is
- 不是:is not
fixture
pytest 的 fixture 是一种强大的功能,用于为测试提供准备和清理操作。
基本概念
定义 Fixture
使用
@pytest.fixture装饰器来定义一个 fixture 函数。该函数可以返回测试所需的数据或状态。1
2
3
4
5import pytest
def sample_data():
return {"key": "value"}使用 Fixture
在测试函数中,通过将 fixture 名称作为参数传递来使用 fixture。
pytest会自动注入 fixture 的返回值。1
2def test_sample_data(sample_data):
assert sample_data["key"] == "value"
Fixture 的高级用法
自动清理
可以通过在 fixture 函数中使用
yield关键字来添加清理操作。在yield之前的代码是设置阶段,yield之后的代码是清理阶段。1
2
3
4
5
6
7
def sample_file():
# Setup
file = open("temp_file.txt", "w")
yield file
# Teardown
file.close()作用域
Fixture 的作用域决定了 fixture 的生命周期。可以通过
scope参数设置作用域:function(默认):每个测试函数调用一次。class:每个测试类调用一次。module:每个测试模块调用一次。session:测试会话期间调用一次。
1
2
3
4
5
def db_connection():
conn = create_db_connection()
yield conn
conn.close()Fixture 依赖
Fixtures 可以依赖于其他 fixtures。只需将其他 fixtures 名称作为参数传递即可
1
2
3
4
def db_data(db_connection):
# 相当于闭包写法
return fetch_data_from_db(db_connection)Fixture 作为参数
使用 fixture 作为测试函数的参数,以将其注入到测试中
1
2def test_db_data(db_data):
assert db_data is not None
Pytest测试框架的Fixture机制
@pytest.fixture(scope=,params=,autouse=,ids=,name=)
参数说明:
scope :表示的是被@pytest.fixture标记的方法的作用域。 【function:默认,class(类),module(模块),package/session】
params:参数化(支持:列表,元祖,字典列表[{},{},{}],字典元祖[(),(),()])
autouse:True:自动执行,默认False
ids:当 使用params参数化时,给每一个值设置一个变量名,意义不大
name:给表示的是被pytest.fixture标记的方法取一个别名
在Pytest测试框架中,Fixture机制是一种用于管理测试用例依赖关系的机制。Fixture机制可以在测试用例执行之前和之后执行一些操作,例如创建测试数据、打开数据库连接、清理测试数据等。
在Pytest中使用@pytest.fixture装饰器装饰一个函数,该函数可以yield或return返回数据、对象或者一个函数。在测试用例中,使用@pytest.mark.usefixtures装饰器来或将Fixture函数名作为参数或使用Fixture。
1 | import pytest |
Fixture生效范围
Fixture函数可以通过scope指定作用范围,Pytest中的Fixture函数支持以下5种范围:
- Session会话级:scope=‘session’,运行一次Pytest算一次会话。运行期间只setup/teardown一次
Package包级:scope=‘pacakge’,对每个包Python包setup/teardown一次 - Module模块级:scope=‘module’,对每个Python脚本setup/teardown一次
- Class级:scope=‘class’,对每个测试类setup/teardown一次
- Function级:scope=‘function’,默认,每个测试函数或测试方法setup/teardown一次
1 | from selenium import webdriver |
Fixture数据共享及同名覆盖
Fixture函数一般作为公用的辅助方法或全局变量来使用,因此需要在不同用例中都能使用。Pytest框架中使用固定名称的conftest.py文件,来集中管理Fixture函数 。
conftest.py文件同级即下级目录中的所有用例可以无需导入,直接使用conftest.py中的所有Fixture函数。
conftest.py文件在不同的目录中可以有多个(生效范围不同),同时用例文件中也可以编写Fixture函数,当Fixture函数有重名时,采用“就近”原则,离当前用例最近的Fixture函数生效。
1 |
|
1 | conftest.py文件的作用: |
Fixture返回函数对象
由于Fixture函数不接收普通参数,无法根据用例需要进行特定的测试准备,此时我们一般需要封装一个实用函数并导入使用,也可以把函数定义到Fixture函数的内部,并返回该函数对象,这样用例无需导入便可直接使用功能函数。
- 常规导入模块方式
1 | # auth.py |
1 | # test_project_api.py |
- 封装成Fixture方式
1 | # conftest.py |
1 | # test_project_api.py |
直接autouse=True传递给fixture(autouse=True)
将会在有效范围的test用例全部默认执行
conftest.py 用法
fixture函数的发现顺序从测试类开始,然后是测试模块,然后是conftest.py文件,最后是内置和第三方插件。你还可以使用
conftest.py文件来实现本地每个目录的插件
conftest.py 是 pytest 框架中的一个特殊文件,用于定义和共享 fixtures、hooks 和插件等。这些内容可以在同一目录及其子目录的测试文件中被自动发现和使用。无需导入
同名方法可能会被覆盖掉
定义共享 Fixtures
在
conftest.py中定义的 fixtures 可以在该文件所在目录及其所有子目录的测试文件中使用。这使得 fixture 的定义可以在多个测试模块间共享。1
2
3
4
5
6# conftest.py
import pytest
def sample_data():
return {"key": "value"}作用域和清理
可以在
conftest.py中定义具有不同作用域和清理操作的 fixtures,以便在项目的多个测试中重用这些 fixtures。1
2
3
4
5
6
7
8# conftest.py
import pytest
# 可以将autouse设置为True,此后在该作用域内,所有测试用例都会默认执行
def db_connection():
conn = create_db_connection()
yield conn
conn.close()不同传递参数和使用
1
2
3
4
5
6
7
8
9
10
11
12
13
14
15
16
17
18
19
20
21
22
23
24
25
26# conftest.py
import pytest
def db_connection():
print("db_setup")
yield 222
print("db_teardown")
def temp_file(request):
print("file_setup")
yield 111
print("file_teardown")
# test_01.py
class TestConf:
def test_01_db(self, db_connection, request):
print("db_testing")
print(db_connection) # 222
print(request.getfixturevalue('temp_file')) # 111
# 如果使用了autouse=True,可以利用定义的函数参数来接受
def test_02_file(self, request):
print("db_testing")
print(request.getfixturevalue('temp_file')) # 111
使用marks标记测试用例
通过使用@pytest.mark你可以轻松地在测试用例上设置元数据。标记只对测试用例有效,对fixtures方法无效。
- skip - 始终跳过该测试用例
- skipif - 遇到特定情况跳过该测试用例
- xfail - 遇到特定情况,产生一个“期望失败”输出
- parametrize - 在同一个测试用例上运行多次调用(译者注: 参数化数据驱动)
标记测试用例 - @pytest.mark
使用 @pytest.mark 可以为测试用例添加标记
1 | import pytest |
使用@pytest.mark.smoke标记后,可以使用pytest -m smoke 运行所有被@pytest.mark.smoke标记的用例
为了防止用户意外输错标记名称,还可以将smoke标记添加在pytest.ini markers参数中。但执行参数还要加上--strict才能生效。这样用户输入-m参数,不在markers中就会报错
1 | [pytest] |
标记跳过 - @pytest.mark.skip
使用 @pytest.mark.skip 标记可以跳过某个测试用例
1 | import pytest |
标记条件跳过 - 使用 @pytest.mark.skipif 标记可以根据条件跳过测试用例
1 | import pytest |
标记期望失败 - 使用 @pytest.mark.xfail 标记可以标记测试用例为期望失败
1 | import pytest |
自定义标记 - @pytest.mark
Pytest测试框架的参数化机制
Pytest提供了三种参数化方式:
使用@pytest.mark.paramitrize()标记进行数据驱动测试 parametrize
1 | # 单循环 |
使用Fixture函数的params参数,进行参数化测试准备
1 | users = [ |
使用钩子函数pytest_generate_tests(),动态成多条用例
1 | # conftest.py |
1 | # test_a.py |
Pytest测试框架的收集机制
在Pytest测试框架中,收集机制是一种用于自动收集测试用例的机制。Pytest测试框架会自动搜索指定目录下的测试文件,并收集其中的测试用例。
以下是Pytest测试框架的收集机制的一些常用用法:
默认收集规则
Pytest测试框架的默认收集规则是搜索以test_开头或以_test结尾的文件,并收集其中的测试用例。例如,test_sum.py、sum_test.py、test_sum.py::test_sum等文件和测试用例都会被收集。
根据正则匹配收集用例
可以使用pytest命令的-k选项来指定收集指定目录下的测试文件。例如,可以使用以下命令来收集tests目录下的所有测试文件:
1 | pytest -k tests |
自定义收集规则
可以使用pytest_collection_modifyitems钩子函数来自定义收集规则
1 | def pytest_collection_modifyitems(items): |
unittest.TestCase 支持
Pytest支持unittest开箱即用的基于Python的测试
要使用运行现有unittest样式的测试套件pytest,请键入pytest tests。pytest将自动收集unittest.TestCase子类及其test方法test_*.py或*_test.py文件
Pytest测试框架扩展 - 插件
如果安装了插件,则
pytest自动查找并集成它,无需激活它
pytest用例标记插件 - @pytestrail.case (需安装pytest-testrail 插件)
1 | import pytest |
pytest测试顺序插件 - @pytest.mark.order() (需安装 pytest-order 插件)
1 |
|
pytest 设置最大运行时间 - @pytest.mark.timeout (需安装 pytest-timeout 插件)
1 | # Timeout after 2 seconds |
pytest-rerunfailures - 失败重新运行
pytest-cov:覆盖率报告,与分布式测试兼容
pytest-xdist:将测试分发到CPU和远程主机,以盒装模式运行,允许分段故障,在looponfailing模式下运行,自动重新运行文件更改的失败测试。
pytest-instafail:在测试运行期间报告失败。
pytest-bdd使用行为驱动的测试编写测试。
Pytest自定义插件开发
插件包含一个或多个钩子(hooks)方法函数。[编写钩子(hooks)方法解释了如何自己编写钩子(hooks)方法函数的基础知识和细节。pytest通过调用以下插件的[指定挂钩来实现配置,收集,运行和报告的所有方面:
- 内置插件:从pytest的内部
_pytest目录加载。 - 外部插件:已安装的第三方插件,通过其打包元数据中的入口点发现。
- conftest.py插件:在测试目录中自动发现的模块
pytest.ini 配置项
| 配置项 | 说明 | 默认值 |
|---|---|---|
| addopts | 额外(默认)命令行参数 | 空 |
| cache_dir | 设置存储缓存插件内容的目录 | .pytest_cache |
| confcutdir | 设置向上搜索conftest.py文件的目录 |
空 |
| console_output_style | 设置用例执行进度的控制台输出样式,支持classic、progress和count三种 | progress |
| log_cli | 设置True表示在终端输出日志信息 | |
| log_cli_level | 设置日志级别 | |
| log_cli_format | 设置time.strftime()与日志记录捕获格式化日期时将使用的兼容字符串 |
|
| markers | 定义自定义标记,用于标记测试用例 |
日志记录
pytest 已经集成了logging日志,可以在不需要封装logging的情况下使用,只需导入 logging即可使用
pytest结合allure
安装 allure
1 | $ pip install allure-pytest |
在pytest 执行语句中 加入–alluredir,即可生成allure报告
1 | $ pytest --alluredir=test-results |
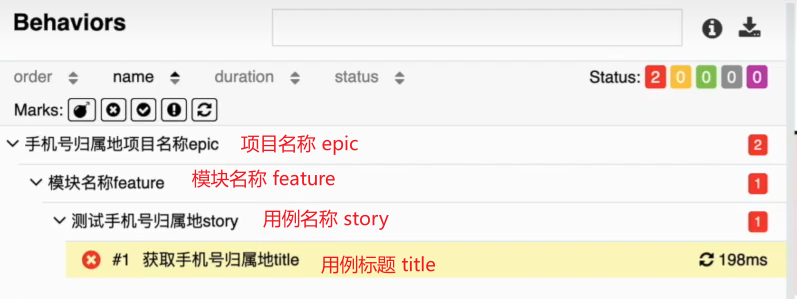
allure在pytest框架内的标记使用
- epic描述
@allure.epic(epic_name):- 标记测试用例所属的史诗。
1 |
|
- 模块名称
@allure.feature(feature_name):
标记测试用例所属的特性或功能模块。
1 |
|
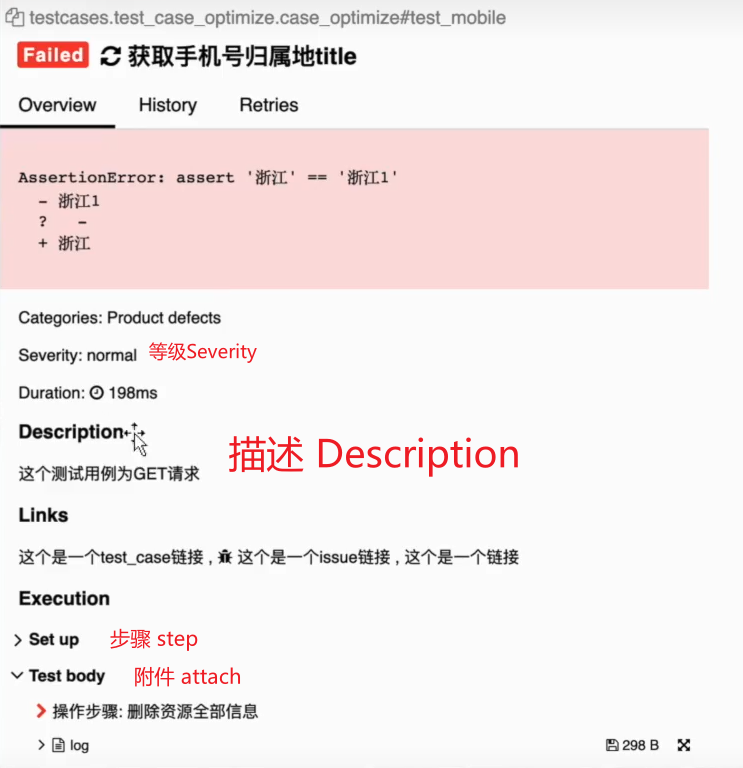
- 用例标题
@allure.title(title):- 定义用例标题
1 |
|
- 用例名称
@allure.story(story_name):
标记测试用例所属的用户故事或子功能。
1 |
|
- 用例等级
@allure.severity(severity_level):
标记测试用例的严重性级别。blocker、critical、normal、minor、trival
1 |
|
- 用例描述
@allure.description(description):
添加测试用例的描述信息。
1 |
|
- 操作步骤
@allure.step(step_description):
标记测试中的步骤,可以在报告中展现测试执行过程。
1 |
|
- 添加附件
allure.attachment(data, name, attachment_type):
作用:添加附件到测试报告,可以是文本、图片、文件等。
参数:
data表示要附加的数据,name为附件名称,attachment_type表示附件类型。示例:
1
2
3
4
5
6
7
8def test_login(username, password):
allure.attachment("Test Description", "This test case verifies the login functionality.")
# 执行登录操作
login_result = perform_login(username, password)
# 断言登录结果
assert login_result == "success"
- 缺陷链接
@allure.issue(url):- 添加 Bug 或任务的链接。
1 |
|
- 测试用例链接
@allure.testcase(url):- 添加关联的测试用例链接。
1 |
|
- 定义链接
@allure.link(url, name):- 添加通用的链接,可以是任何网页链接。
1 |
|
@allure.owner(owner):- 标记测试用例的所有者或责任人。
1 |
|

